When we tell people we are planting a big garden this year, we wonder whether the term “big” is truly comprehended. You see, we are just your typical suburban dwellers who happen to have a passion for eating fresh, real food and growing our own organic produce. Our humble abode sits on a tiny plot of land upon which, for the last 5 years, we have creatively used every allowable square inch to grow everything from kale to tomatoes to spaghetti squash and cucumbers. We even have our own blueberry bushes and strawberry patch! Unfortunately, we’ve reached a point where our space is maxed out, and we really cannot provide enough food in the space we have to feed ourselves year round. Our passion for raising organic produce and knowing where our food came from has lead us to take on the elusive “big” garden.
If you want to see how we’ve maximized our space in the past, including a great space-saving structure to build for plants…Click Here!
This year, we’ve been given a gift that has helped nullify our itch for more land. One of Andy’s (my husbands) clients offered for us to use a parcel of their 11 acre property to grow the garden of our dreams! They have a giant plot filled with soil from composted leaves and trees, out of which we carved a 40×90 foot garden, or about 1/10th of an acre.
It doesn’t seem like a crazy amount of space, but we’ve planned it to hopefully provide enough vegetables to feed us this summer and allow me to preserve (freeze and can) for the winter. We still plan to grow a few things at our own house too(herbs, lettuces, a few tomatoes and cucumbers, kale, cabbage, chard, and berries).
This post is intended to summarize what we’ve been up to the past several months with planning and preparing our garden for the summer.
We drop a pretty penny each week during the summer at the farmers market, so we’re hoping this garden will help curb some costs in addition to giving us food that we know from seed to sprout to sustenance. We’ve found, however, that this first year may prove to be more of an investment rather than a money saver (maybe a break even?), but we love doing it!
In no way do we claim to be gardening experts. Although we’ve tried our hand at growing a variety of foods the past few years, a large scale operation is an entirely different endeavor, and every year brings new challenges and problem solving. We must give a BIG thank you to Old World Garden Farms blog! They have so many great ideas when it comes to DIY gardening and we’ve relied heavily on their experiences. Check them out!
Each step has been a learning experience, but for what it’s worth, here’s some highlights from our journey:
Planning a Giant Garden Step #1:
Create a plan. Not just a nice idea but a detailed plan that includes what you want to grow along with measurements. Our plan began back in January. We (mostly Andy) used Excel to plan out what we wanted to plant in what space. Garden books helped us determine how many plants we could place per row based on special requirements. Staggering the plants within each row allows us to get more per row as well.
Here’s an example of our plan…
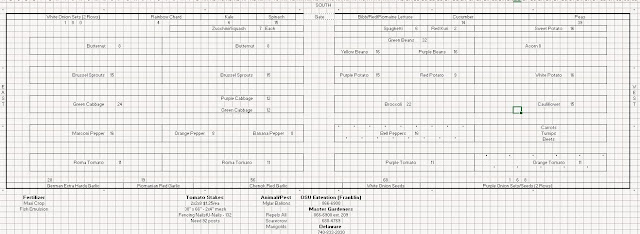 |
| This was a rough estimate that evolved as we got planting. The bed itself ended up being a little bigger than expected so we squeezed in another row for radishes and squashes! |
Step #2: Order Seeds and Start them Inside
We ordered most of our seeds from Sustainable Seed Company, which are organic, heirloom, non-GMO seeds. Potatoes and sweet potatoes were ordered separately. For several months we converted our spare bedroom into a seed-sprouting oasis. With grow lights, fans, and humidity (luckily, no cops showed up at our door for suspicious growing activity!). We purchased the 4″ pots so the seedlings would not have to be transplanted to a bigger pot once they got too big (a problem we had last year). I also made little popsicle-stick markers to identify each plant.
 |
| Starting our seeds in 4″ pots inside. We purchased hundreds of the pots, trays to go underneath the pots to catch the water, and lids to help keep in heat for germination. |

.JPG) |
| The structure we (mostly Andy) built to hold our seedlings. It was so big we had to disassemble it to get the monster upstairs! |
 |
| Some of our little sprouts in March. The grow lights are raised as the plants grow. |


Step #3: Prepare your Land and Amend the Soil
We started out with a tilled 40×90 foot plot. Based on our plan, we had to measure and create the raised beds by raking the soil into 6″ mounds and filling in the walkways using good ole’ elbow grease. We also hauled in leaves and woodchips from the surrounding area to cover the walkways. Needless to say, we were pretty sore the next day. No amount of lifting weight or hitting the gym can prepare you for full on manual labor!
One issue we anticipated was our soil composition. This soil is mostly comprised of composted leaves and woodchips (high in carbon, low in nitrogen). So we opted to get our soil tested through Penn State by ordering the kit through a local supplier and sending it in. Our soil was low in Phosphate and Nitrogen, and the pH was too high. This will cause certain plants (like leafy greens) to not do as well. Great info but we really didn’t know how to apply it to organic gardening. We ended up liberally applying a fish-emulsion concentrate to the beds and plants (this is an ongoing process), as well as sulfur to decrease the pH and soft rock phosphate. Ohio Earth Food is a great company, from whom we’ve been purchasing a natural/organic compound fertilizer for organic gardening to help balance the soil.
Ideally, we would mix in our own pastured chicken or cow manure which is a rich source of nitrogen and nutrients for the soil. But, since we live in a neighborhood and the only chicken I have in my house is in the freezer…I’m fresh out of composted manure. #suburbanproblems
 |
| Here’s the garden itself before we made all the rows or put up fencing |
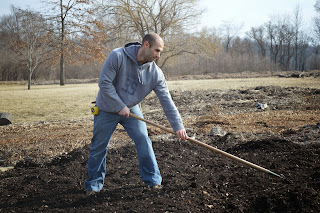 |
| We built each bed up (Raised Bed Gardening) so that the water doesn’t collect and drown the plant. Talk about manual labor. Our beds are 3 feet wide. |
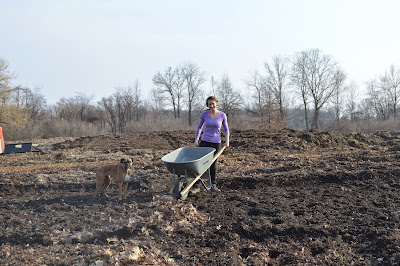 |
| Hauling leaves and wood-chips to create 2 foot paths between each row. Mulching with wood, leaves, or straw on the rows and in the beds keeps the weeds down so you can focus on the plants and not weeding all day long! |
 |
| Raised beds once completed. There’s one 4 foot-wide pathway up the middle |
Step #4: Irrigate and Protect!
It is critical to have a plan for watering as well as keeping pests out of the garden. It is best to water at the base of the plants as opposed to watering from overhead. Due to the size of our garden, we opted for a drip irrigation system. For our home garden we use soaker hoses (essentially the same) but they are designed if you are planning a smaller-scale operation. At first we tried pumping the water from a pond though our irrigation system, but our pump was too small, so we resorted to using the city water spigot which works well. The watering will become more necessary as the spring rain subsides and July heat sets in.
For Pest Control:
1) Plant Garlic and Onions around the perimeter of the garden. Animals do not like the strong scent and will stay away!
2) Marigold’s planted throughout the garden will also help deter pests, as well as attract bees!
3) We put up a simple fence using Deer-X mesh and metal poles, then buried the bottom to prevent animals from digging under.
4) I also make a homemade bug and rabbit repellant by blending 3 cloves of fresh garlic, jalapeno pepper, habanero peppers, and cayenne pepper with water. Let set for 1 day. Strain mixture, stir in 1 tsp. of dish soap, and transfer to a spray bottle. Apply often!
 |
| Our drip irrigation system that we ordered to fit our garden. Each bed has 2 strips of drip tape. This cuts down greatly on watering time! |
 |
| To fence or not to fence? Dilemma #5000. Since the garden is so large, we knew there needed to be some protection from deer, rabbit, and other little scavengers. Initially we were not doing a fence due to cost and planned to sprinkle a natural repellent. But of course we caved after finding this “Deer-X” Fence for pretty cheap. The fence looks great, you can barely see it. In fact, Libby dog thought she was going through the door and busted through the fence at full speed. …Add patching fence to the to-do list… |
Step #5: Plant and Transplant the Cold Weather Crops
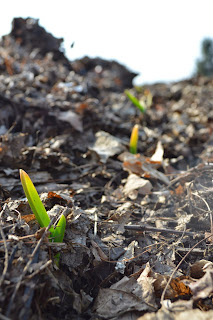 |
| Baby Garlic that Andy planted last fall. We purchased organic garlic cloves in bulk… each clove makes 1 bulb so we’ll have 150 bulbs! |
 |
| Peas, beets, and turnip seeds that were soaked overnight before planting directly in the ground. |
 |
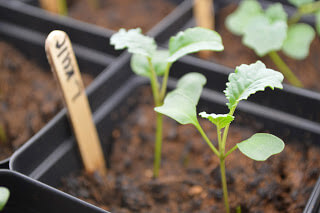
| Mid April: Cabbage, Brussel Sprouts, Broccoli, and Cauliflower plants that were started inside, ready to be transplanted! It was risky with the threat of frost and we did have a little cabbage damage, but they have since recovered!! |
 |
| The best part is when I get to make cute markers for the vegetables 😉
Stay tuned for more Garden Adventures including homemade tomato and pepper stakes!
|


 Metagenics Supplements